Change the financial year with TallyPrime 4.1
here is the Three Best option for Change Financial Year with TallyPrime4.1, so please start Journey with us.
Frist Option (Split Company Data)
Open TallyPrime4.1 Software:
Launch the TallyPrime4.1 application on your computer by double-clicking the desktop icon or accessing it from the Start menu.
Select Company:
Choose the company whose data you want to split from the list of companies displayed on the TallyPrime4.1 dashboard. Click on the company name to select it.
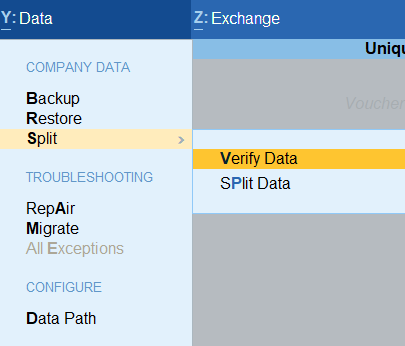
Navigate to Data Management:
You can Select Data Tab at the Top Row of TallyPrime4.1 or Press Alt + Y
Choose Split Company Data:
Within the Data, look for the option labelled “Split” or similar wording. Click on this option to initiate the data splitting process.
Select Data to Split:
A window will appear prompting you to choose the data range you want to split. Specify the date range or other criteria for splitting the data. This could be based on financial years, quarters, or any other relevant period.
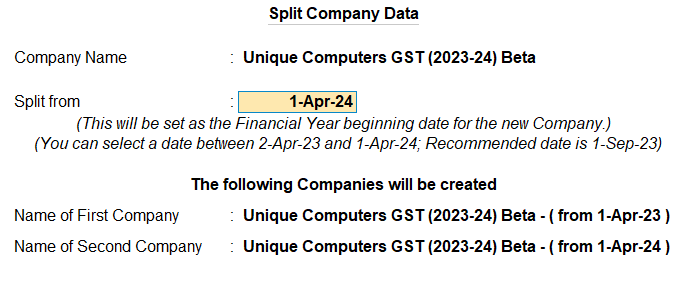
Configure Split Parameters:
TallyPrime4.1 will then ask you to configure the split parameters. You may need to specify details such as the new company name, the destination folder for the split data, and any other relevant settings.
Verify Split Settings:
Review the settings you’ve chosen to ensure they are correct. Double-check the data range, split parameters, and destination details before proceeding.
Initiate Data Splitting:
Once you’re satisfied with the settings, click on the “Split Data” or similar button to start the splitting process. TallyPrime4.1 will begin splitting the company data based on your specifications.
Monitor Progress:
TallyPrime4.1 will display a progress bar or indicator to show the status of the data splitting process. Depending on the size of the data and your computer’s performance, this may take some time to complete.
Completion Confirmation:
Once the data splitting process is finished, you will receive a confirmation message indicating that the operation was successful. You can now access the split data in the specified destination folder.
Review Split Data:
After the process is complete, it’s advisable to review the split data to ensure that it has been divided correctly according to your requirements.
Backup Split Data:
As a precautionary measure, consider backing up the split data to prevent any loss of information. You can do this by copying the split data folder to a secure location or using Tally Prime4.1 backup functionality.
By following these steps, you can effectively split data in TallyPrime 4.1, allowing for better organization and management of company information.
Second Option (Create New Company and Import Masters)
“Creating a New Company:
Creating a new company in TallyPrime4.1 is now easier than ever. Follow these simple steps to set up your new company according to your requirements:
Launch TallyPrime4.1 :
Open the TallyPrime4.1 software on your computer.
Create New Company with TallyPrime4.1:
Click on the ‘Create Company’ option. This will prompt you to enter details for your new company.
Company Name, Company Mailing Name, Address, Pin Code, Mobile Number, Address,
Choose Your financial Year 1. Apr.24
You can Enable Security Options also if Required
Now Ctrl + A
Now Enter your GSTN Details
Importing Data from Previous Company:
If you have data from a previous company that you want to import, follow these steps:
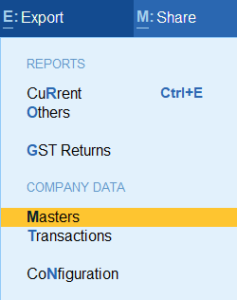
- Export Data from Last Year’s Company:
Open your previous company in TallyPrime4.1.
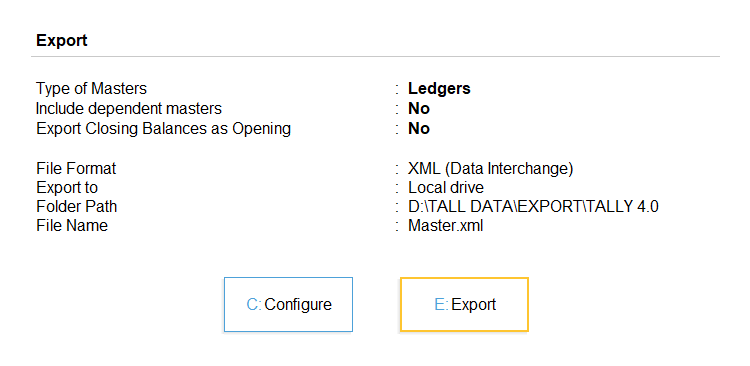
Navigate to ‘Export’ and select ‘Masters’.
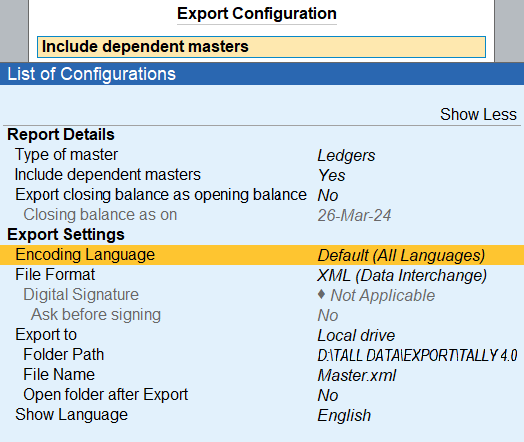
Configure the export settings, ensuring to include all necessary details such as master type and file format (XML).
Export the data to a designated folder.
- Import Data into New Company:
Switch to your new company in TallyPrime4.1.
Navigate to ‘Import’ and choose ‘Master’.
Locate the exported XML file from your previous company.
Confirm the file path and select ‘Modify with New Data’ to import the data into your new company.
Update Company Details:
Once the new company is created, ensure to update all relevant details such as company name, mailing address, contact information, and financial year.
Configure Opening Balances:
Decide whether to import closing balances as opening balances for the new company. You can choose to do this automatically or manually enter balances for ledgers and stock items.
Set Up GSTN Details:
Enter your GSTN (Goods and Services Tax Identification Number) details for tax compliance.
Complete the Process:
Once everything is set up to your satisfaction, save the changes and exit the setup wizard.
By following these steps, you can effortlessly create a new company in TallyPrime4.1, import data from a previous company, and start managing your finances efficiently.”
Third Option (Change Period)
Progressing to the New Financial Year (2024) in TallyPrime4.1
Select Your Company:
Begin by selecting your current company in TallyPrime.
Access Sales Voucher:
Navigate to the Sales Voucher section.
Set the Date:
Hit the F2 key and enter the date as April 1, 2024.
Encountering an Error?
If you encounter an error stating ‘Date Cannot be above the Current Period (1-APR-24)’, don’t worry. Simply press Alt + F2.

Adjust the Period:
Now, you’ll have the option to change the period from April 1, 2024, to March 31, 2025. This ensures that you’re operating within the correct financial year.
Enjoy the New Financial Year:
With the period adjusted, you’re all set to enjoy the benefits of the new financial year in TallyPrime4.1.
Flexibility for Future Adjustments:
Remember, TallyPrime4.1 offers the flexibility to split your company data anytime according to your requirements. So, you can adapt your financial setup as needed in the future.
By following these steps, you can seamlessly transition to the new financial year in TallyPrime4.1, ensuring smooth operations and accurate financial reporting.”
For More Details you can check us at https://youtu.be/rm5_fQK5MNs?si=QsSWpqsHP4pP8SUC
if you want to Update Your TSS and Purchase a New TallyPrime4.1 License Please contact us